Editing the hosts file is a temporary measure to preview a newly transferred site on our servers before changing the domain’s DNS. This allows you to access the site on Host-Age.com servers as if you had already changed the domain’s DNS. The site can only be viewed this way from the computer where the hosts file is modified. Below we show how to make this change on computers running Windows, Mac OS, or Linux.
Modifying the hosts file involves adding two entries. Each entry contains the IP address where you want the site to resolve and the domain variations with and without www. For example, add the following two lines with www.domain.com and domain.com plus the allocated IP.
89.38.233.180 www.domain.com
89.38.233.180 domain.com
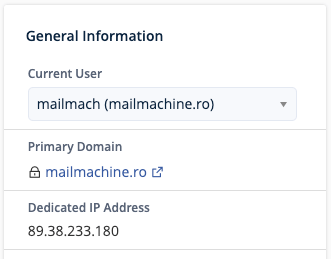
This can be the shared IP of the server or a dedicated IP if you opted for one. You can find your site’s IP in cPanel, as shown in the image below.
Editing the hosts file on Windows
Windows 8, 10, and 11
1. Press the Windows key.
2. Type Notepad in the search field.
3. In the search results, right-click on Notepad and select Run as administrator.
4. In Notepad, open the file:
c:\Windows\System32\Drivers\etc\hosts
5. Make the necessary changes in the file.
6. Save the file.
Windows Vista and Windows 7
1. Select Start > All Programs > Accessories.
2. Right-click on Notepad and select Run as administrator.
3. Windows will ask for your permission; the UAC window appears.
4. Click Continue to grant permission.
5. Notepad opens.
6. In Notepad, open the file: c:\Windows\System32\Drivers\etc\hosts
7. Make the necessary changes.
8. Select File > Save to save the changes.
Editing the hosts file on Mac OS
1. Select Applications > Utilities > Terminal to open a Terminal window.
2. Type the following command in Terminal to open the hosts file:
sudo nano /private/etc/hosts and press Enter.
3. You will be prompted to enter the administrator password.
4. Edit the file.
5. To save changes, press Control+X.
6. When prompted with Save modified buffer (ANSWERING “No” WILL DESTROY CHANGES)?, press y.
7. When prompted with File Name to write : /private/etc/hosts, press Enter.
8. In Terminal, type dscacheutil -flushcache and press Enter.
Editing the hosts file on Linux
1. Open a Terminal window.
2. Enter the following command to open the hosts file in an editor:
sudo nano /etc/hosts and press Enter.
3. You will be prompted to enter the administrator password.
4. Make the necessary changes.
5. Press Control-X.
6. When prompted with Save modified buffer (ANSWERING “No” WILL DESTROY CHANGES)?, press y.
7. When prompted with File Name to write : /private/etc/hosts, press Enter.